The material of a wine tote gets most of the attention, but the thing that makes a bag look like your bag is the decoration on the panel, and that decision is where most orders go sideways. Pick the wrong method and a two-color logo turns into a four-figure setup bill, or a photographic label comes back looking like a rubber stamp. This is a walkthrough for specifying the print on a custom wine tote so the proof matches what is in your head and the invoice matches what is in your budget.
Choose the decoration method before you touch the artwork
There are three methods that cover almost every wine tote made, and they are not interchangeable. Screen printing pushes ink through a stencil, one screen per color. It lays down opaque, durable spot colors and is the default for cotton, canvas, and non-woven bags in any real quantity. Heat transfer, including the digital DTF (direct-to-film) process that has largely replaced older vinyl transfers, presses a pre-printed graphic onto the fabric. It reproduces gradients, photographs, and unlimited colors without a separate screen for each one. Embroidery stitches the design in thread rather than printing it, which reads as premium and survives years of washing, but it cannot hold fine detail and is priced by stitch count rather than by color.
The practical rule is that the method should follow the artwork and the quantity, not your preference. A crisp one- or two-color logo on a few hundred canvas totes is a screen-printing job. A full-color winery label with a photographic vineyard shot is a heat-transfer job. A monogram or a coat of arms on a small run of gift totes is an embroidery job. Trying to force any of these onto the wrong method is the single most common reason a first proof gets rejected.
Count your colors, because that is what you are really paying for
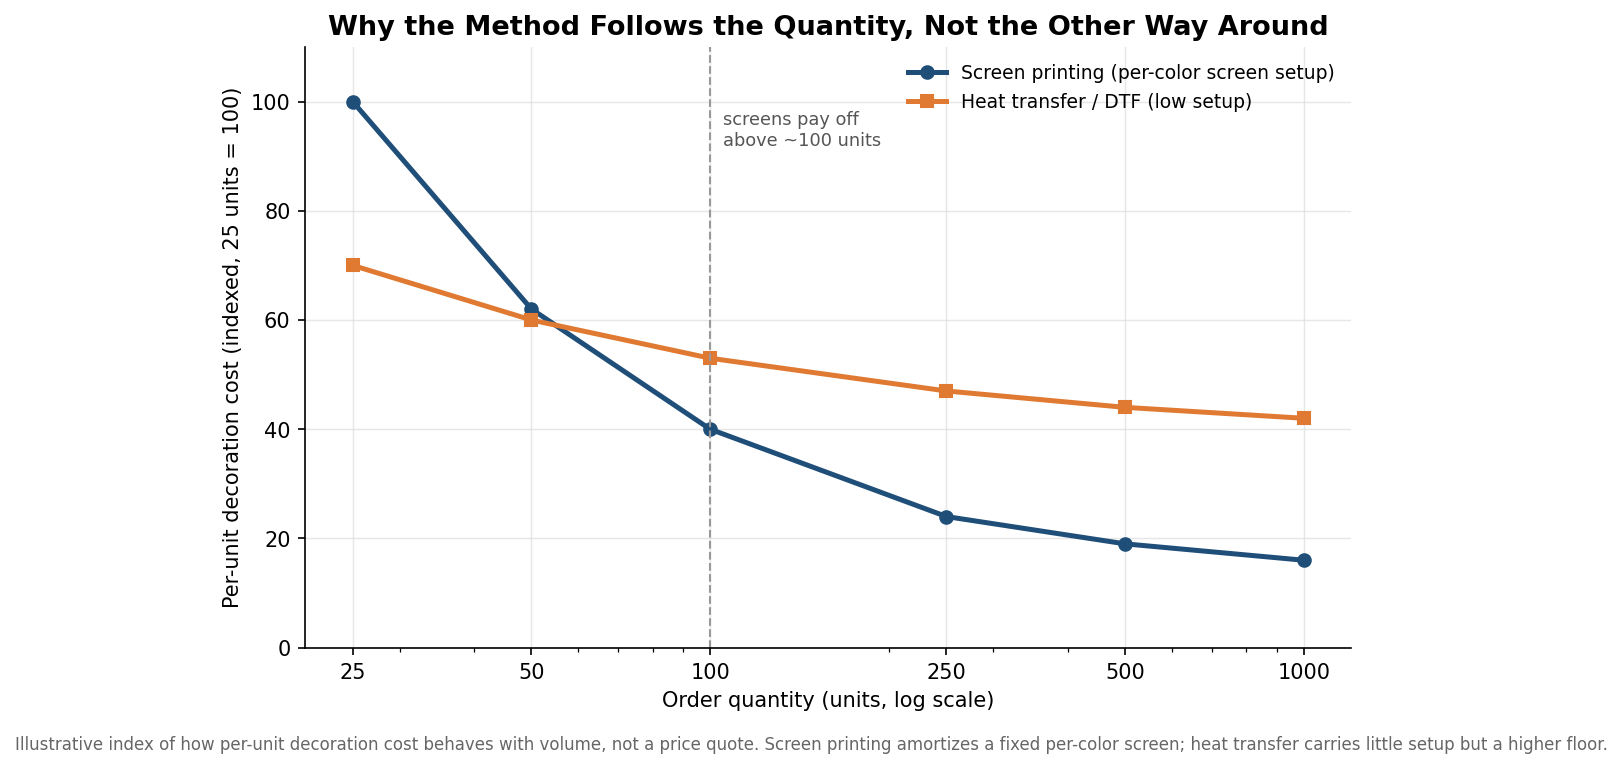
With screen printing, cost is driven less by the number of bags than by the number of colors. Each spot color needs its own screen, its own setup, and its own pass on the press, so a one-color print is dramatically cheaper to start than a four-color one at the same quantity. Most logos live comfortably in one to three colors, and if yours does, screen printing will almost always be the cheapest route once you are past a hundred pieces or so. If your art has gradients, drop shadows, or a photographic element, you are no longer counting colors at all, and heat transfer becomes both easier and often cheaper because it ignores color count entirely.
The chart below is an illustrative index rather than a price list, but it captures the economics that matter. Screen printing carries a fixed per-color setup that gets spread across the run, so its per-unit cost falls steeply as quantity climbs. Heat transfer carries almost no setup but sits on a higher per-piece floor. The two cross somewhere in the low hundreds, which is exactly why a supplier will steer a 50-bag order toward transfer and a 500-bag order toward screens.
Embroidery follows a third logic. You pay a one-time digitizing fee to convert your logo into a stitch file, and then each bag is priced by how many stitches it takes to sew. A palm-sized mark is often somewhere in the range of 5,000 to 15,000 stitches; the exact figure depends on fill area, not on how many colors of thread you use. Fine text below roughly a quarter inch tends to blur into the weave, so embroidery rewards simple, bold shapes and punishes busy logos.
Get the brand color and the file right the first time
Whatever method you choose, two artwork details decide whether the proof is usable. The first is color specification. Do not describe your brand color as “navy” and hope; give the supplier a Pantone (PMS) number so the ink or transfer is mixed to a defined target. Screens and DTF can both hit a Pantone reference closely, though a printed color on natural canvas will always read slightly warmer than the same ink on white non-woven, because the fabric shows through. The second detail is file format. Screen printing and embroidery both want vector art, an AI, EPS, or vector PDF, because the design has to be separated cleanly into colors or stitch paths. Heat transfer will accept a high-resolution raster file, but it needs to be at least 300 dpi at the actual print size, not a logo pulled off a website.
Size the art to the panel, not to the page. A single-bottle wine tote gives you a usable imprint area of roughly three-and-a-half to four inches wide on the front face; a two-bottle or six-bottle tote gives you more room but also more curved and seamed real estate to avoid. Keep the design clear of zippers, handles, and side seams by at least a finger’s width, because ink and transfers do not lie down well over a fold.
Know the minimums and where the price actually breaks
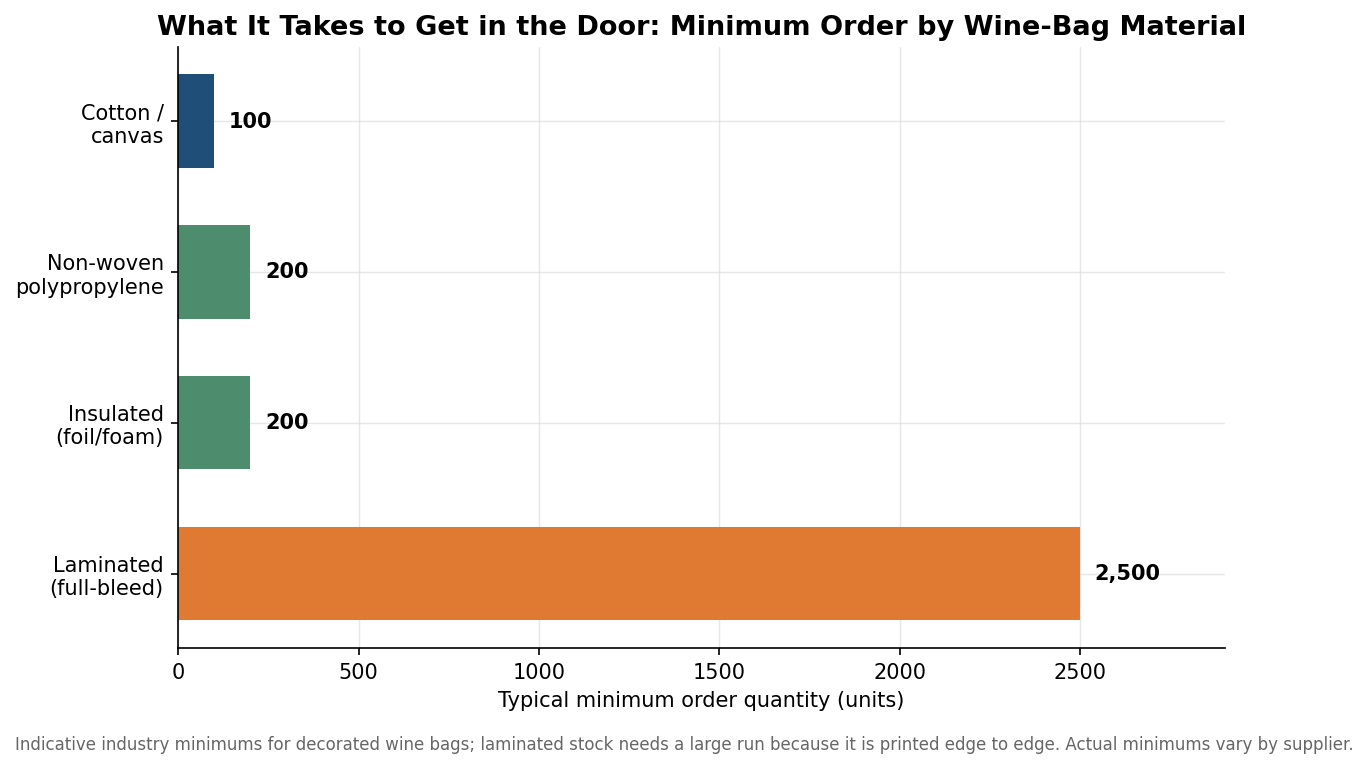
Every decorated wine bag carries a minimum order, and it varies more by material than by print method. Cotton and canvas totes tend to start around 100 units, non-woven and insulated styles around 200, and fully laminated bags with edge-to-edge printing often require a run in the thousands because the graphic is manufactured into the material rather than applied afterward.
Unit pricing steps down at quantity breaks that are worth planning around. As a rough indication, a lightweight non-woven wine bag can land under three dollars a unit at a couple hundred pieces, while a heavier canvas or insulated tote sits well above that, and moving from 200 to 300 units often trims the per-unit price by ten to twenty percent because the fixed setup is spread wider. If you are close to a break, it is frequently cheaper per bag to order up to it than to sit just below. When you genuinely need fewer than a hundred, the honest answer is usually to buy blank stock and brand it with a woven hang tag, a stamped kraft card, or a sticker rather than paying small-run decoration premiums.
Proof, then plan the calendar backward
Ask for a proof before anything goes on press, and read it for the boring things: the Pantone reference, the imprint dimensions in inches, and the placement measured from a seam. A digital proof catches layout errors; a physical pre-production sample, if the run is large enough to justify it, catches how the ink actually sits on that specific fabric. Build in time for it. As a general guide, decorated wine totes run something like two to three weeks in production after art approval for screen printing, a little longer when embroidery digitizing is involved, and longer still for laminated full-bleed bags. If you are ordering for a holiday season, a wedding, or a tasting-room launch, count backward from the date you need them in hand, add a week of slack for a proofing round, and place the order against that deadline rather than the ship date you are hoping for.
None of this is complicated once the order of operations is right: settle the method against your art and volume, count your colors, lock the Pantone and the file, confirm the minimum and the break points, and never skip the proof. Do that and the tote that arrives is the one you designed, at the price you were quoted.